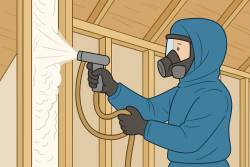
Whether you are building a new home or redoing insulation in your current home, drill and fill insulation is an excellent choice. It is generally a less expensive and more efficient option. In this article, you will learn everything about drill and fill insulation and how to use it at home.
What is Drill and Fill?
Drill and Fill insulation is an ideal method to re-insulate existing walls. It involves drilling holes in the walls and blowing in insulation to fill the holes or empty spaces.
Professionals apply insulation using a blowing machine. As the name suggests, only drill and fill are conducted in this method. Professionals drill little holes into each wall bay, then blow cellulose insulation right in there. In contrast to traditional batt insulation, this technique insulates every nook and cranny.
A more comfortable and energy-efficient home can be created by applying this type of insulation to the inside of walls. Additionally, it is excellent for soundproofing. It is highly recommended that professionals carry out the installation in a reliable and efficient manner.
Why Choose Drill and Fill Insulation for Your Home?
Unlike batt insulation, this method provides complete coverage. It expands to fill every empty space or hole when it is blown in. Drill and fill ensures complete sealing by filling insulation into every nook and corner of your home. Using the drill and fill technique is ideal when you are re-insulating walls or maximizing R-values. As a result, you will save money on energy bills, retain warm and cold air during winter and summer, and feel more comfortable in your home.
How to Install Drill and Fill Insulation?
Before you begin drill and fill insulation, a few pre-preparations need to be done. The first step is to move all the furniture out of the room. Lay down drop cloths to capture the dust drilling produces. Locate the studs behind your wall. Then you have to mark the drill targets between the studs. To find the studs in the wall, use a battery-powered stud finder to speed up this process. You can get a stud finder from your local hardware store.
Attach a four-inch hole saw to your power drill. Start drilling and avoid hitting studs by doing it slowly and cautiously. If you want to prevent inhaling dust and debris, wear a dust mask. Now it’s time to start insulating. Use an insulation blowing machine with a long attachment to insert into each hole. Insert cellulose insulation into each hole. As you go, use a stick to press down any loose insulation.
Lastly, it is time to repair once the insulation is fully filled throughout the walls. Holes can be filled using a construction material that gives a smooth, flat look and provides complete sealing. Afterwards, paint everything with a paintbrush and stand back to admire your newly insulated walls. Do it Yourself is not recommended for the drill and fill method. It is best to hire professionals for this job.
Choose Reitzel Insulation
Our experienced insulation contractors have the skill to complete every insulation project perfectly. We offer two different products for drill and fill insulation. One is cellulose, and the other one is 1-lb open-cell pourable foam. These two are CCMC certified and equally safe to use for residential properties.
.jpg)


